

It's fairly easy to regain control though, if you follow a few relatively simple steps, which I will explain. I will use Gmail for the examples, as that is what I am familiar with, but the methods used should probably be fairly similar for other email systems. This might look quite complicated as you read it, but to actually do it takes hardly any time at all, so don't be put off by the long explanation. I'm just trying to make things clear. As soon as you start doing it, you will find it's really quite straightforward.
The first step is to decide what type of emails you need to keep, and arrange a number of storage folders to keep them in, so that your Inbox remains reasonably clear and easy to handle. In Gmail these folders are referred to as Labels, but other systems might refer to them as Mailboxes, or whatever. The principle will be the same.
To start working with Labels in Gmail, go to your Inbox, and select an email that you want to keep, and decide on a suitable label name for the 'mailbox' you want it stored in. You can set up as many Labels as you need, and they can be changed at any time, if they're not quite what you need. You might only need two folders, one for Personal mail, and one for Work, or you might need several. Just use whatever system suits your needs. If you have emails you're unsure of, you could of course create suitably named boxes for them, until you decide what to do with them.
In my example, I have set up a new Gmail account, and I want to store the information emails from Google in a separate folder, labeled 'Google Information', to keep my inbox clear, and to keep all Google information together for future reference.
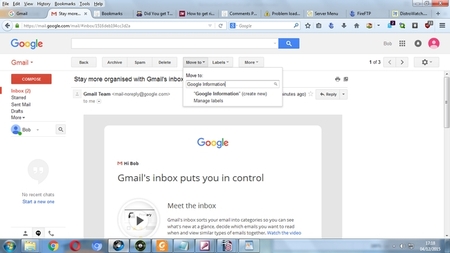
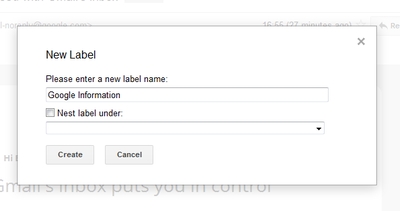
With the email open, select the button marked 'Move to' near the top of the Gmail page. If you only have black icons instead of text on the buttons, hover the mouse over the black icons until 'Move to' appears, and click that button. As you will be creating a new label, type in the new name, and click 'create new'. Another box will open, so just click the Create button in that, and that's it. If you want to, you can make the new Label a sub folder of another Label, using the 'Nest label under' option.
On the left hand side of the page you should now have a button with your new label name on it, and if you click it, you will find your email safely inside. You now know the basics of using Labels. You can also create labels by clicking the Labels button next to the Move to button. The procedure is pretty much the same. At this point, it would be sensible to set up all the Labels you think you will need, but obviously you can create others later if necessary.
Having mastered Labels, the next step is to automate the sorting, especially if you have a lot of old emails to sort, and to do that you can use Filters. With a long established email account, and a full Inbox, you will probably need a lot of filters, but it will still be much quicker and less tedious than sorting manually, and once set up, the filters will continue to sort the new mail as it arrives.
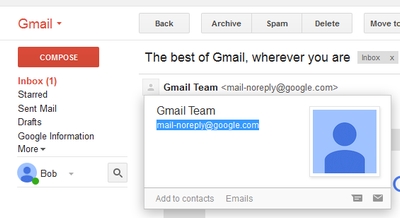
Start by opening an email, and at the top left of the email, you should see a small 'head and shoulders' icon, possibly followed by the sender's name and email address. Hover the mouse over the icon, and a box will appear, and that should contain the sender's email address. Highlight the address, then right click and select copy.
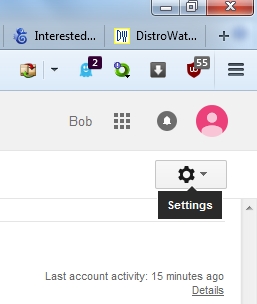
At the top right of the email is a kind of gear wheel icon, which will display 'Settings' when you hover over it. Click that, and select 'Settings' from the drop down menu.
When the Settings page opens, select 'Filters and Blocked Addresses at the top of the page, and another page will open. At the bottom of the page select 'Create a new filter'.
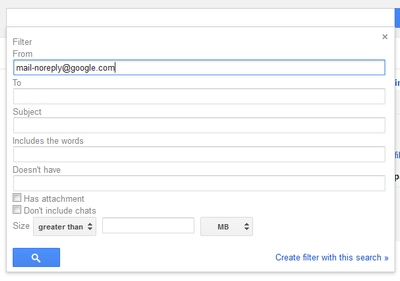
A box will open, with various text boxes. Click in the first one, marked From, and paste in the email address you copied earlier. When you have gained some experience with Filters, you will easily be able to understand and possibly use some of the other options if necessary, but for now, just click 'create filter with this search' at bottom right of the box.

Yet another box will open, and this is where the real power of Filters lies, because here you give instructions on how to deal with mail from that address.
Because we are sorting, and arranging for future emails to be automatically sorted, tick the top check box, marked 'Skip the Inbox (Archive it)'. Also tick 'Apply the label, and select the label you want to use for that group of emails. If there is more than one email in the filtered group, tick the box labeled 'also apply filter to matching conversations' at the bottom of the box.
Please note: Obviously you can use the filter to automatically delete unwanted emails, rather than store them, by simply ticking only the Delete box at this point.
You may possibly choose to use more options, such as 'Mark as read', when you are more experienced with filters, but for now, simply click 'Create filter', and that's it.
When you go back to the inbox, all emails from the filtered address will have been moved to the selected Label, or deleted, and your Inbox will contain less emails. Just repeat adding filters until the Inbox is manageable.
You should now have a good working knowledge of how to use Filters and Labels.
The final, and perhaps most obvious thing to do, is to reduce the amount of emails that you receive in the first place.
Take a look at one of the emails you receive that is obviously advertising something you aren't interested in. You may be wondering why the company that sent it has your email address. If you ordered something from them at some point, that's the reason, but if not, that company might be connected with a company you did buy from, so your email address was possibly added to their mailing list in that way.
You should be able to stop emails arriving from that company by unsubscribing from their mailing list, if it is a reputable company, and that is normally fairly easy to do. The 'Unsubscribe' button is usually quite small, and lurking somewhere near the very bottom of the email, so just scroll down until you find it, and click it. Another browser tab will open up, and somewhere on that page there should be an option to unsubscribe, though again you may need to look carefully to find it. They don't really want you to use it, of course. Having unsubscribed, you may be asked why you took that action, and it's obviously up to you if you answer or not.
Unsubscribe from any unwanted emails you receive in the future, if they are genuine, legitimate companies. Of course, if they are simply junk that has found its way past your spam filter, just mark them as Spam, and in future they should automatically be blocked.
If any part of my explanation is in unclear, please leave a message in the Comments section, via the link below, and I will try to explain it more clearly.
This short article is an expanded version of one I posted on the Emerald's Isle forum.